How to use Split View on a Mac & Enjoy Multitasking
January 12, 2023 By Prelo Con

(Image Credit Google)
Use a split screen to display many tabs without everything getting mixed up on the screen. You can divide a screen into two or more areas, each with its own collection of data. Without using a second screen, you may work more productively and see more information in these parts.
The good news is that anyone with a modern Mac can use Split View, a fairly simple split-screen feature found in more recent versions of macOS. To get the most out of your system, use Split View on a Mac, which we'll show you how to do in this guide.
While adding more than one external monitor is always an option for larger projects, here's how you divide your screen on a smaller scale if you need to.
[caption id="attachment_76314" align="aligncenter" width="1200"]

apple[/caption]
Use Split View to begin
- Start by opening two or more windows that you want to be paired in a split-screen configuration. These windows can be browser tabs, programs, documents, or anything else. Look in the upper-left corner of the first window you choose for three colored dots: red, yellow, and green. The window is managed by these.
- A pair of tiny "expand" arrows appear when you hover the cursor over the green dot. When you press and hold this green dot, the following choices appear: Go to full screen, then click in the left-most and right-most Tile windows, respectively. The window will fill that area of your display if you choose the second or third option.
- Your Split View is complete on one half. On one side of the screen, the first app will be displayed, and on the other, any other open windows will be displayed as thumbnails. The other window you chose to utilize in Split View mode will expand to fill the space left by the previously selected window, completing the Split View experience. To change your primary focus as needed, tap either window.
[caption id="" align="alignnone" width="1000"]
Picture Credit: MacKeeper[/caption]
Split View Settings
Your screen doesn't have to be divided evenly while using Split View. Each half of the screen can be moved left or right by clicking and holding on the black divider line. This is especially helpful if you're trying to view a big, oddly designed webpage or need more room for a sizable spreadsheet. Just keep in mind that some applications, like
Apple's Photos, have minimum width requirements, so you might not be able to change the bar too much or at all.
If you decide that you prefer having the windows on different sides, all you have to do is click and hold an app's title bar and drag it to the other side. Automatically, the windows will swap positions.
You're not sure where your menus went. The menu bar in Split View is automatically hidden (and Dock). To access the menus of each program when using Split View, simply move your pointer to the top of the screen. It will then reappear while your pointer is still there.
[caption id="" align="alignnone" width="1600"]

Picture Credit: MacWorld[/caption]
If the windows are too small, you can finally change your resolution.
If either window has a green dot, click on it or hit Esc to exit Split View mode. You can pick up where you left off before entering Split View by executing this, which will restore both windows to their initial state.
Choices for split view
Three additional options are available when you click the Green button in the top-left corner of a window while holding Option (or Alt): Zoom, Move window to left side of screen, and Move window to right side of screen.
The Dock and menu bar are not hidden while using Zoom, but they are when using Enter full screen. Moving a window instead of tiling it has a same effect in that moving does not cover the menu bar and Dock. Moving a window to either side of the screen without entering Split View results in the absence of a movable black bar. No other app needs to be paired.
Capturing a window
After many long years, native window snapping is finally available in macOS, just like it is in
Windows 10. A transparent box will appear in front of any window that is clicked and moved to one of the display's four sides or four corners. This reveals what shape the window will take. It will automatically snap to this position as you let go of the mouse button.
[caption id="attachment_76316" align="alignright" width="1200"]

Image: digitaltrends[/caption]
You have several choices with MacOS Catalina (and newer):
- 25% of your screen will be occupied by a window if you drag it into a corner.
- Drag it to the top of the screen's left or right side, and it will fill the top half of the screen. The bottom half of your screen will be filled if you do the same for the left or right side's bottom portion.
- If you move the window away from the corner of your display, it will fill the left or right half of the screen.
- Make it fill the middle third of the screen by dragging it to the bottom.
- To maximize the app, drag it to the top of the screen. You must be careful with this because if you drag a little bit higher, Mission Control will appear.
Finding the different sweet spots could require some experience because there are so many options. However, giving Mac users access to this feature is a welcome development since they have been denied of it for far too long.
Keep in mind that window snapping is not the same as Split View - when you drag applications into position, they won't go full screen and there is no black bar to change their size.
Let's talk briefly about Mission Control
Do you need a more all-encompassing way to observe the windows you have open at once? Mission Control can be useful.
In this mode, all of your open windows are shown in a ribbon-like format that enables easy switching between them. Additionally, Mission Control enables you to establish numerous virtual desktops (or "spaces"), each with its own open windows and applications. You can switch between desktops with ease because these are also shown on the ribbon.
[caption id="" align="alignnone" width="1560"]
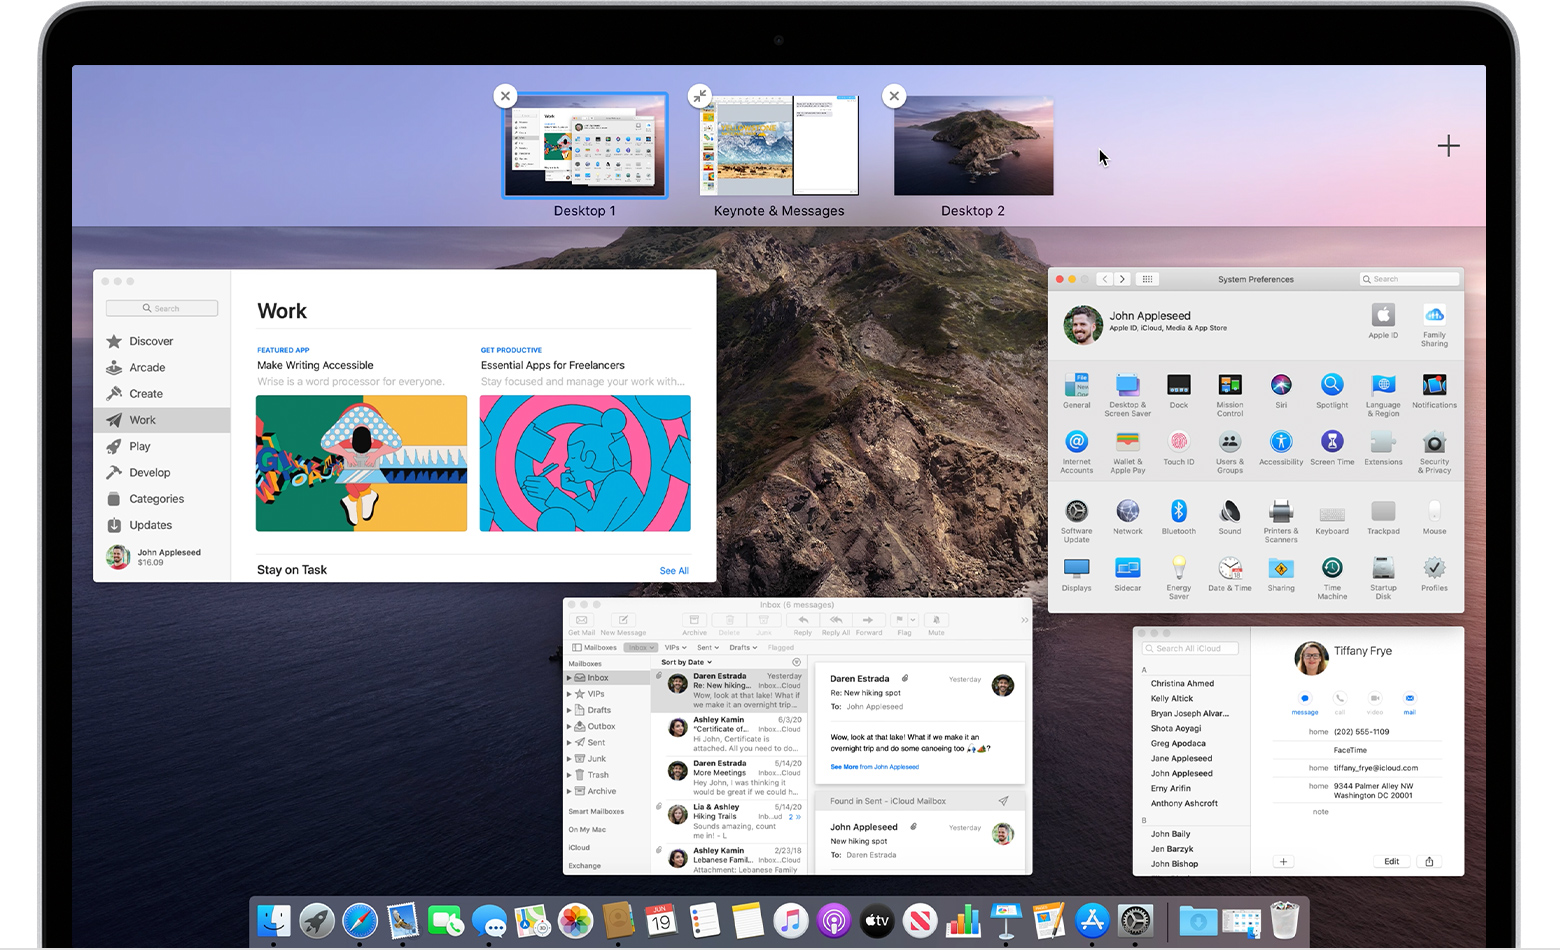
Picture Credit: Apple[/caption]
One of the simplest ways to enter Mission Control is to just drag a window to the top border of your screen, which should put it into Mission Control mode. If you prefer another option, Apple keyboards often contain a Mission Control button (F3 or it has a symbol that resembles three rectangles). Alternatively, if you have a trackpad, you can swipe upward with either three or four fingers (depending on your trackpad settings).
While using Split View, you may also access Mission Control, which makes switching between windows simple. When two full-screen programs are open, Mission Control also enables you to switch to Split View. Simply activate Mission Control, drag your program window over the icon of another window, and drop it in place. This should activate Split View right away.
By Prelo Con
Following my passion by reviewing latest tech. Just love it.